To manually add Other Collateral data, perform these steps:
ABL / BBC Review Manual-Input / Other Collateral
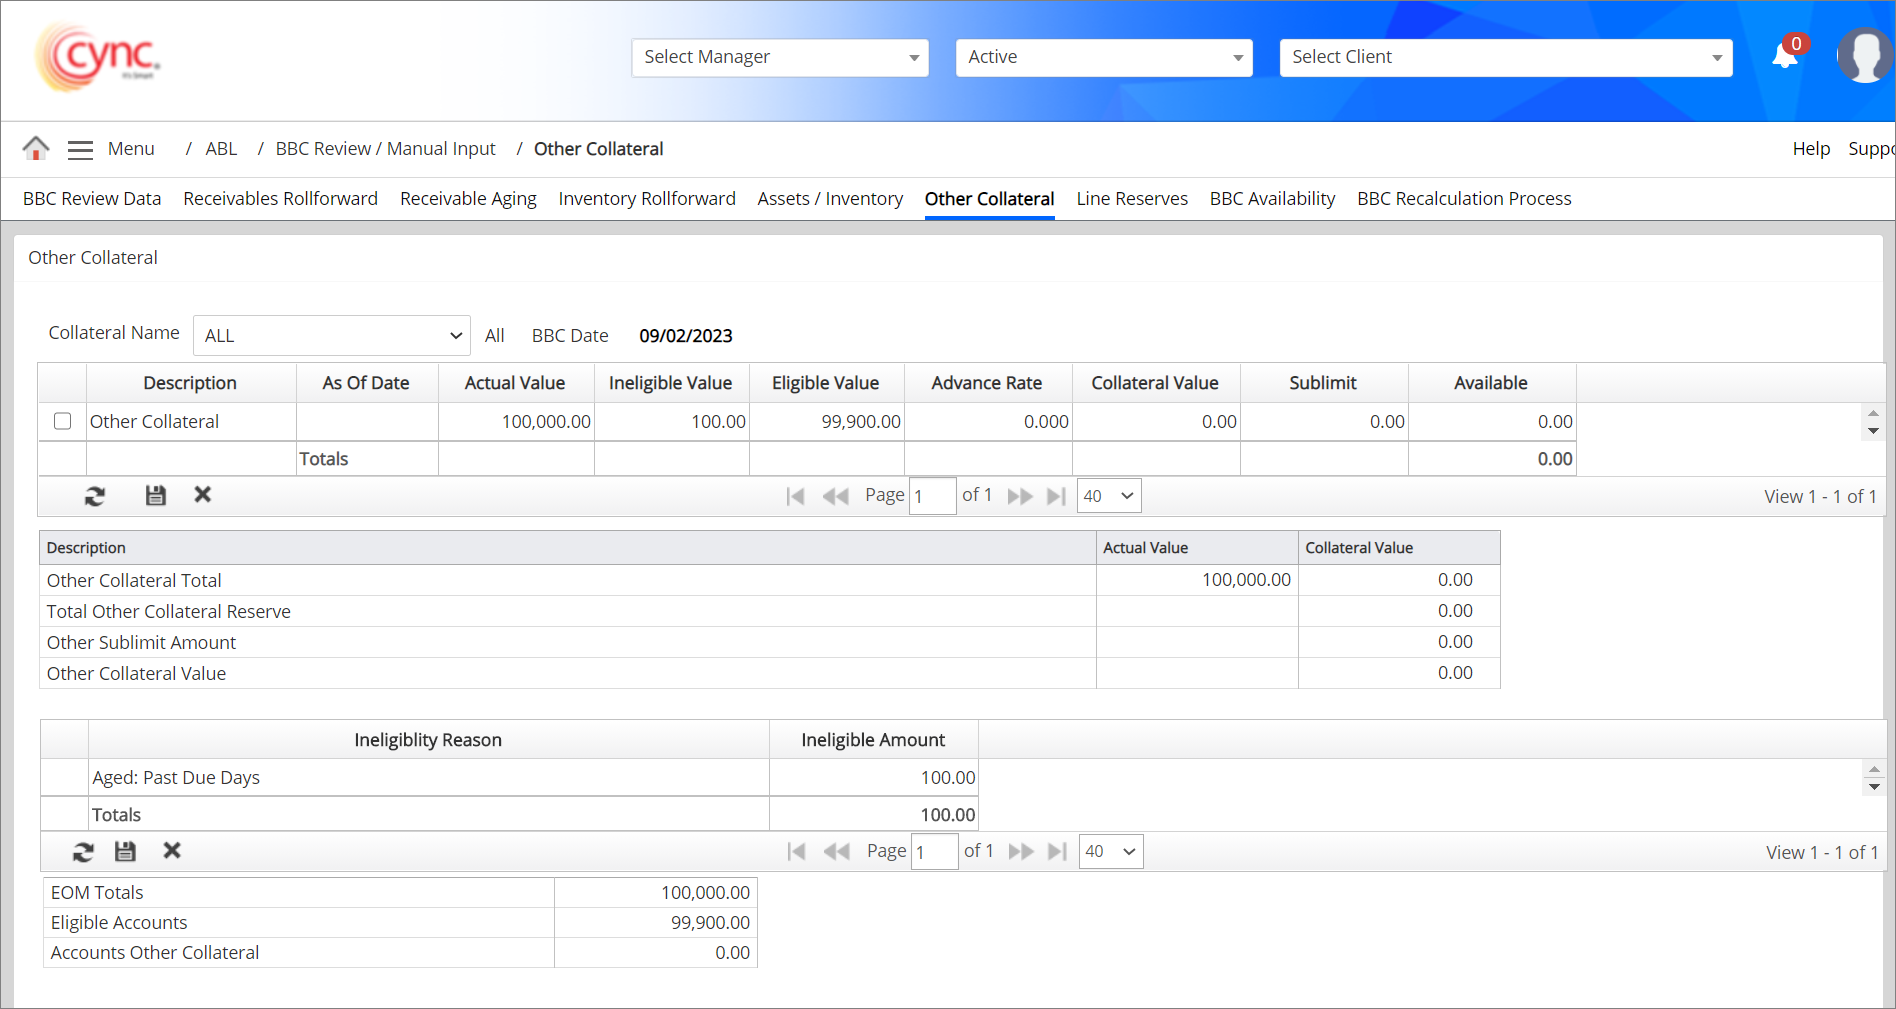
Other Collateral
The Other Collateral page contains a list of all the other collateral. If you had other collateral set up in the Client Parameters → Other Collateral Tab, this screen will give a summary view of those collateral values for the BBC period.
Users can also manually enter other collateral on this page. It also shows the summary of calculated ineligible amounts with ineligible reasons codes of other collaterals for the selected BBC date.
|
Table of Contents |
Navigation: ABL → BBC Review Manual Input → Other Collateral
Refer to the Screenshot:
To manually add Other Collateral data, perform these steps:
1. From the Collateral Name drop-down, select the Other Collateral.
2. Click the '+' icon to highlight a new record.
3. In the Description field, enter the description of the collateral.
4. In the As of Date field, select a date.
5. In the Actual value field, enter the value of the collateral.
6. If the Ineligible value is associated with the collateral, enter the value.
7. Enter the Advance Rate. Cync automatically calculates the Collateral Value.
8. Click the Save button to add the record.
Fields and Descriptions
|
Fields |
Descriptions |
|
Collateral Name |
Specifies the collateral name of the BBC data. |
|
DIV |
Specifies the division related to the collateral. |
|
BBC Date |
Specifies the BBC Date. |
|
Description |
Specifies description for the collateral. |
|
As of Date |
Specifies BBC processed date. |
|
Actual Value |
Specifies actual value of the collateral. |
|
Ineligible Code |
Specifies ineligible code of the collateral. |
|
Ineligible Value |
Specifies ineligible value of the collateral. |
|
Eligible Value |
Specifies eligible value of the collateral. |
|
Advance Rate |
Specifies defined advance rate for the collateral. |
|
Collateral Value |
Specifies collateral value. |
|
Sub Limit |
Specifies sublimit value. |
|
Ineligibility Reason |
Specifies reasons for the ineligibility. |
|
Ineligible Amount |
Specifies the ineligibility amount for other collateral. |
If the Reserve Before Sublimit flag is ON under the Basic Parameters page:
The Available amount will be calculated by deducting the Reserve set for the individual Collateral Name from the Collateral Value and compare with the Sublimit. The Available value is calculated as follows,
Available Amount = MIN(Collateral Value - Reserve, Sublimit).
Here, Reserve = Reserve set for that particular Collateral Name under the Collateral Reserves page.
Collateral Value will be calculated by considering Reserve Before Sublimit as follows,
Collateral Value = Sum of MIN(Collateral Value - Reserve, Sublimit) of all the Collateral Names.
Here, Reserve = Reserve set for each Collateral Name under the Collateral Reserves page.
Total Other Collateral Reserve will be added before Other Sublimit Amount, and Other Collateral Value will be calculated as follows,
Other Collateral Value = MIN( Other Collateral Total - Total Other Collateral Reserve, Other Sublimit Amount).
The Reserve will be considered before sublimit when the Reserve Before Sublimit flag is ON.
This displays the ineligible amount of other collateral. Users can manually add the ineligible amount to the other collateral and the system calculates the ineligible amount based on the parameters set under the Client basic parameters page.
The same ineligibles will be posted to the BBC Availability page.
For more information related ineligibles calculations refer to Client Ineligible calculations.pdf
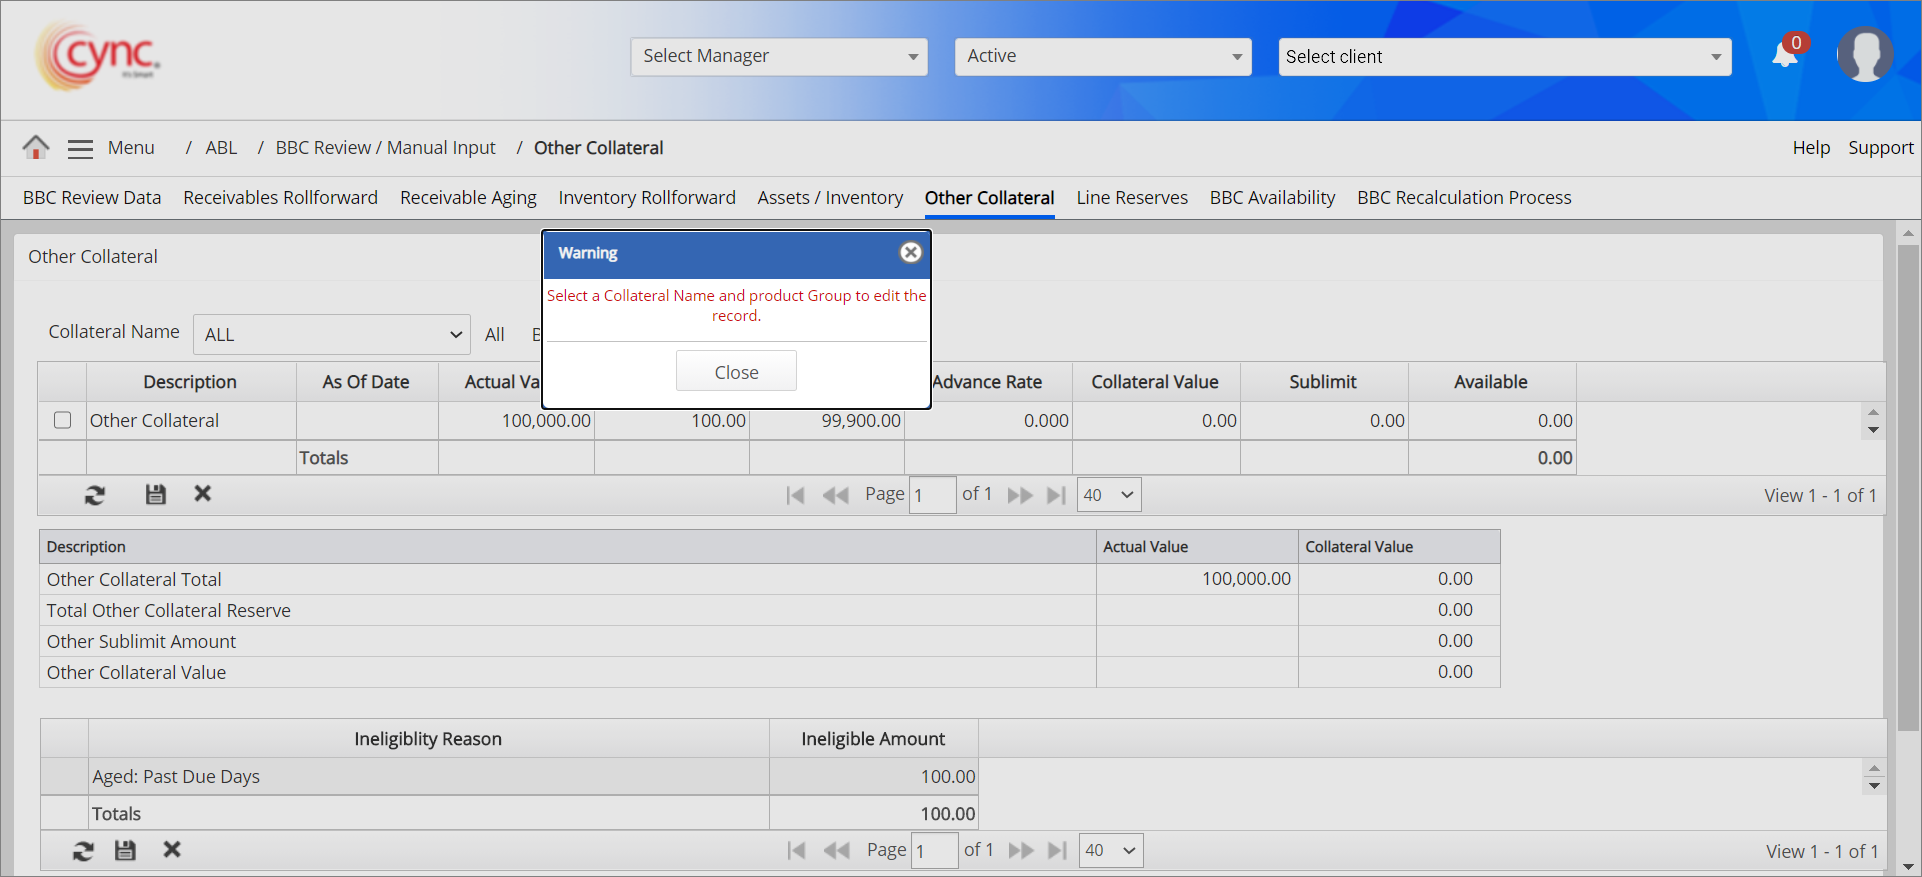
To manually add the ineligible amount and reason, perform these steps:
1. In the Collateral Name field, select the collateral to add the ineligibility details.
2. Click the  button. A new row is highlighted.
3. Select the ineligibility reason and amount. You can simultaneously add multiple client ineligibles records if required.
4. Click the  button.
5. Click  to simultaneously edit multiple ineligible records.
If a user tries to edit manually-entered or system-defined Ineligible Amount or Ineligible Reason fields without selecting the collateral name and the product group, then the system notifies you to select the collateral name and the product group.
Refer to the screenshot:
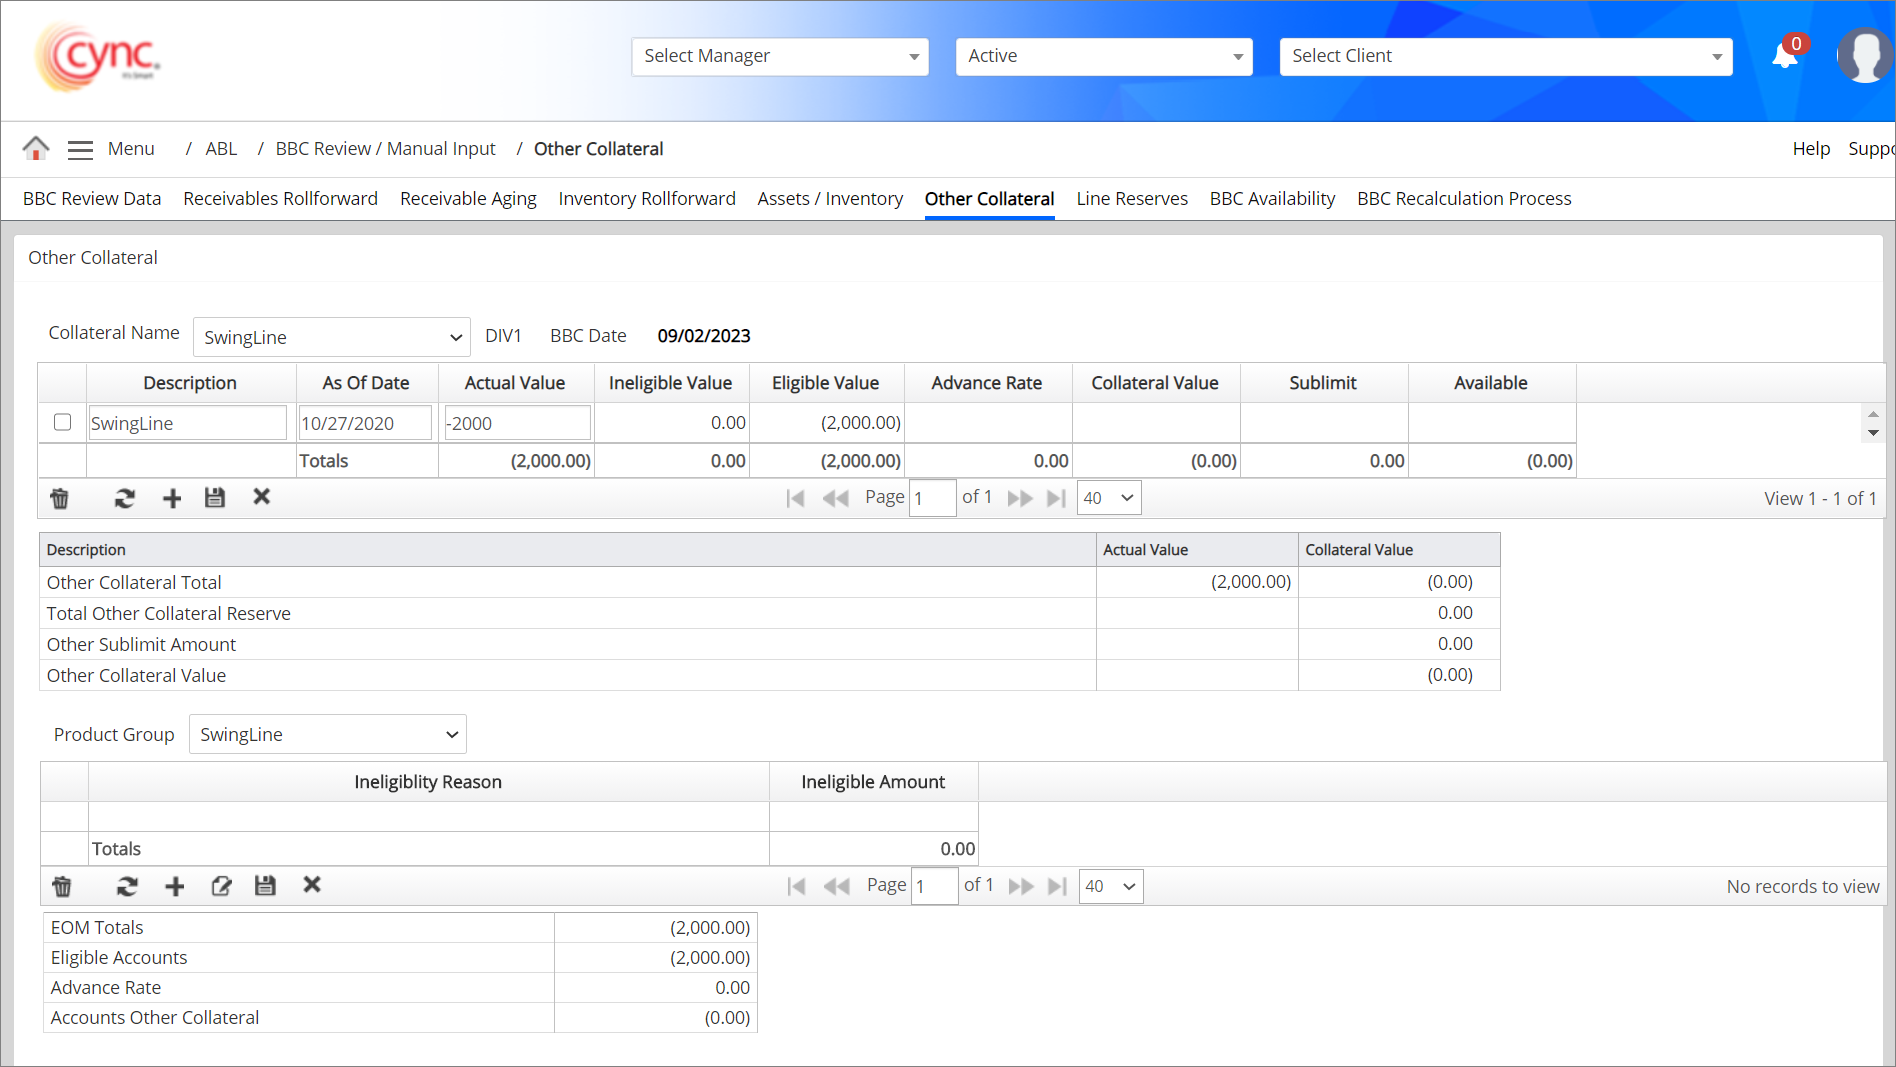
To add a Swing Line value perform these steps:
1. Select 'Swing Line' from the collateral type.
2. Enter the swing line value and click save.
3. The swing line value should be negative so that the same is reduced from the Other collateral value.
The value can be viewed under the BBC Availability page and reports such as BBC Management Report, BBC Trend Report, BBC execution trend report, Collateral Analysis Report and Client Summary reports.
Refer to the screenshot:
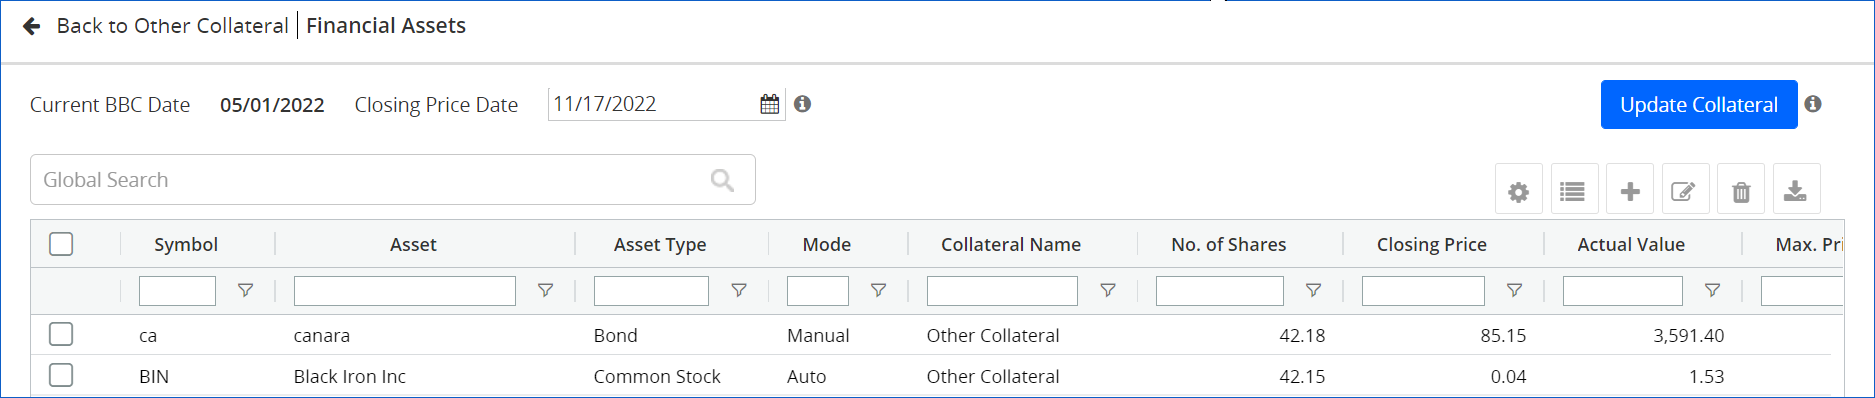
The page will have a table (grid) in which the user can add and manage their financial assets.
The financial assets page has a Calendar input field labelled closing Price Date with the default value as blank.
When the user navigates from Collateral Advance Rate to the Other Collateral page after enabling the Financial Assets button, the labelled Financial Assets button will appear on the right side.
Refer to the screenshot:
.png)
Click on the Financial Assets button – the user will be navigated to a new page where the user can individually add financial assets like Common Stocks, Bonds, ETFs, or Funds.
Refer to the screenshot:
.png)
The Update Collateral button remains in inactive status if there are no records in the Financial Assets grid and on First Time Closing Price Date Selection.
 The Closing Price Date should be later than the last approved BBC Date but before the Current Date.
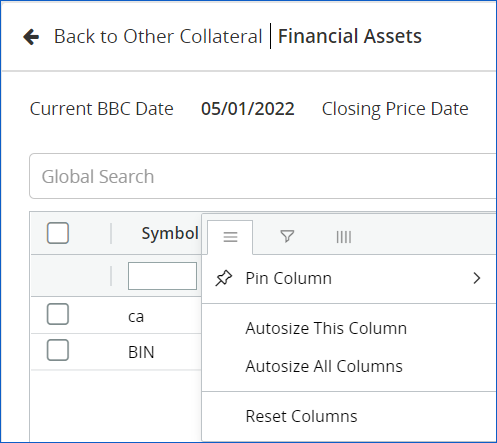
Follow the below steps to change the column properties:
1. Take the cursor to the desired column.
2. Click on the ![]() button. The following options will be displayed. Use any of the options given below.
button. The following options will be displayed. Use any of the options given below.
Refer to the screenshot:
Users can search for the account in Global Search using any account-related data such as asset name or asset type.
The Financial Assets data columns have a filter option beside the search box. The search bar field is used to filter the column data.
Refer to the screenshot:
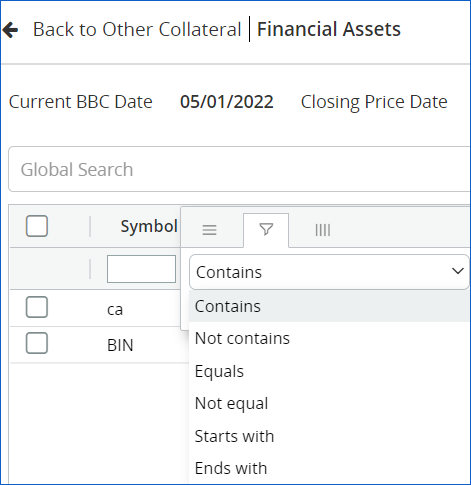
Follow the below steps to filter Financial Assets column data:
1. The user can use the filter option in two ways.
 button next to the search bar in the respective column. button.
2. Select the desired option from the drop-down data.
Refer to the screenshot:
Save Display View facilitates saving the current view of the grid with a name or label. The Save Display View option is available by clicking the gear icon at the right top of the grid.
Columns can be interchanged by clicking and dragging on the column heading.
The Global Search filter will not be saved in Save Display View.
Follow the below steps to save the Display View data:
1. Use the search options or add date values given below the column names to filter the clients’ list.
2. Enter the Display View Name in the Display View field.
3. Add the Description.
4. Click on the Save button. Display View is saved successfully.
Refer to the screenshot:
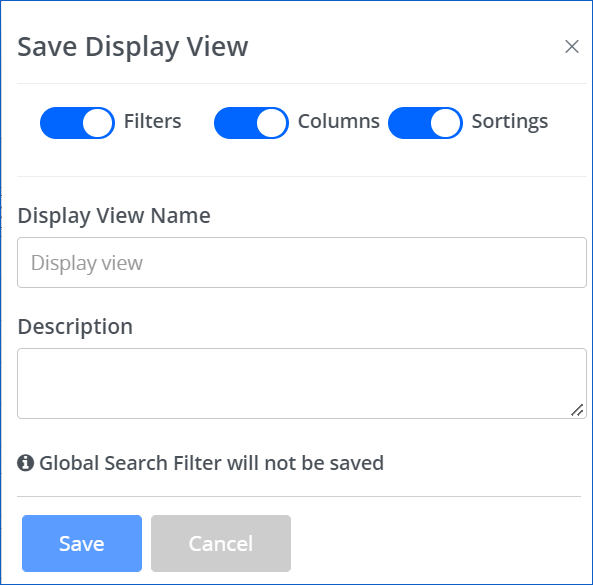
All three toggles, such as Filters, Columns, and Sortings are enabled by default.
On disabling any of the toggles, even if a filter is applied to a column or if a column re-position is done or if a sort is applied, the same will be ignored based on the disabled toggle while creating the saved view.
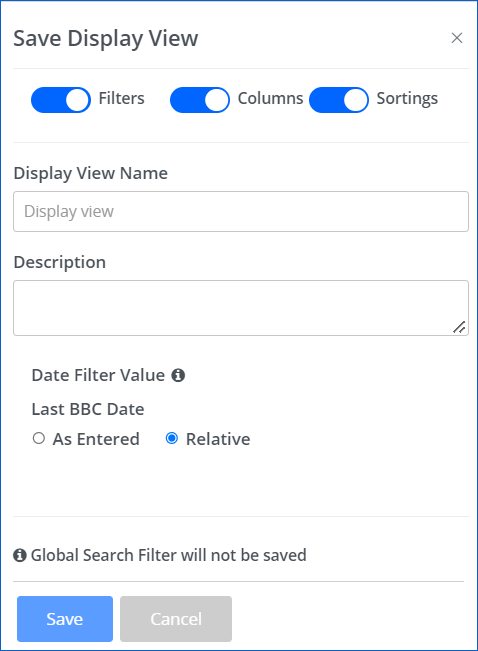
When any date is selected as a filter value, select any one of the options (As entered or Relative) given for the Last BBC Date in the Save Display View box.
1. As Entered - If As Entered option is selected to create a saved view, the application will consider the exact date selected in the Date Filter column.
2. Relative - If the Relative option is selected to create a saved view, the application will consider the exact date selected in the Date Filter column and display the grid with the relative date applied in the filter.
Refer to the screenshot:
Fields and Descriptions
|
Fields |
Descriptions |
|
Display View Name |
Display View Name field facilitates the user to enter a name or label for the Display view being created. |
|
Description |
Description facilitates the user to enter a description for the Display View being created. |
|
Save |
Save button facilitates the user to save the view of the current grid displayed. |
|
Cancel |
The Cancel button facilitates the user to abort the Save Display View action on clicking the button. |
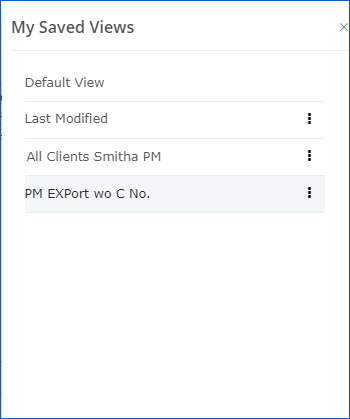
My Saved Views displays all grid views saved via Save Display View which can be accessed by clicking the list icon on the right top corner of the grid.
Refer to the screenshot:

Default View in My Saved Views
1. Default View - It is the default view of the Cync grid view.
2. Last Modified - The Last Modified option displays the grid as per the last modification the user has done before implementing the Cync gird.
Refer to the screenshot:
Editing and Deleting a Saved View
Follow the below steps to edit and delete the Saved views:
1. Click on the ![]() button next to the saved view name.
button next to the saved view name.
Refer to the screenshot:
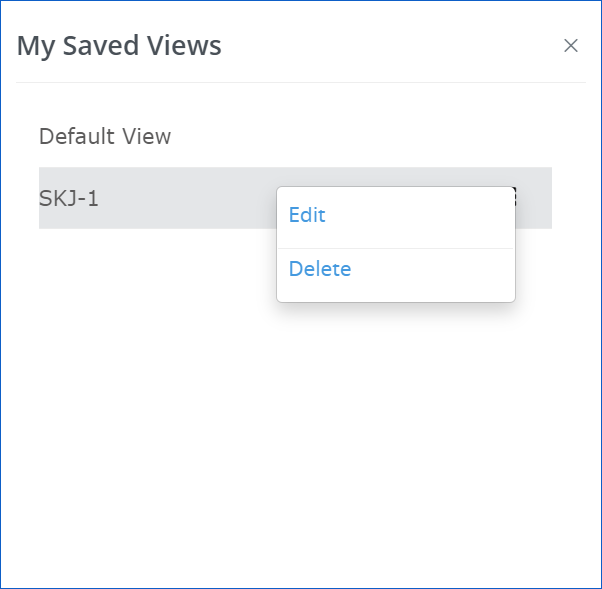
2. Click on the Edit link to edit the default view. Edit the fields required and click on the Update button.
3. Click on the Delete link to delete the saved default view. Click on the Confirm Delete button.
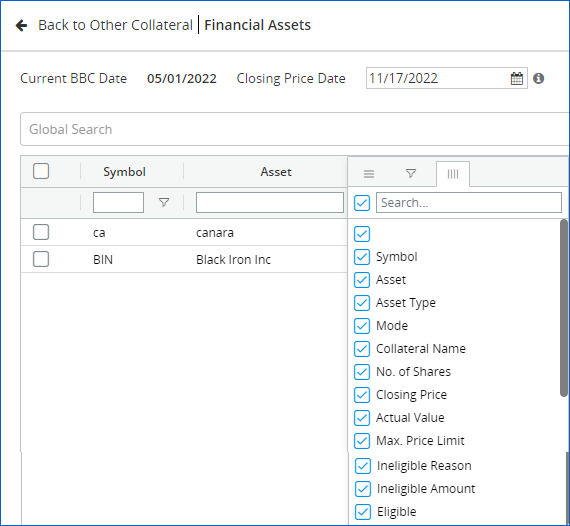
Follow the below steps to customize the fields on the Financial Assets page:
1. Navigate to the desired column.
2. Click on the ![]() button on the right side.
button on the right side.
3. Click on the ![]() button to customize the fields.
button to customize the fields.
4. Users can customize the fields by checking or unchecking the checkboxes and using the search option.
5. The Financial Assets page shows selected fields. Users can also map the user-defined fields as required.
Refer to the screenshot:
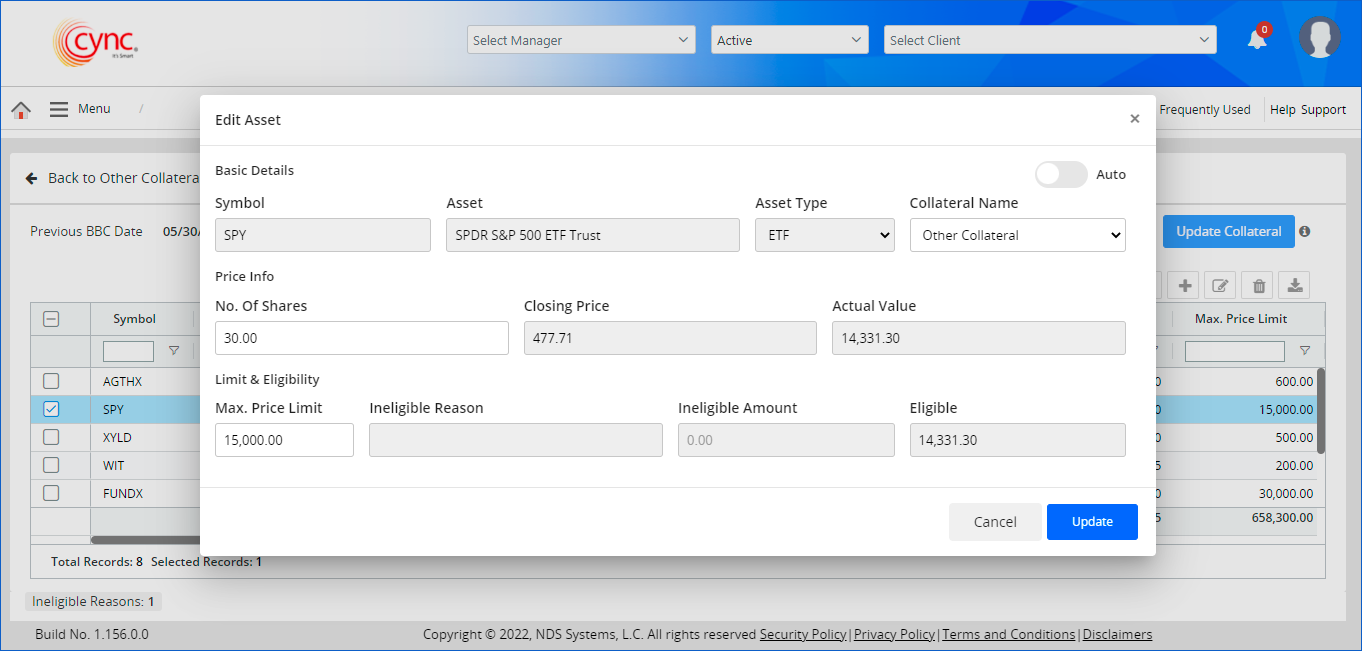
The available asset types are Fund, ETF, Common Stock, and Bond.
Follow the below steps to add assets.
1. To Set up a Closing Price Date in the Financial Assets default page, click on the  button.
2. Fill out the Basic Details, Price Info, and Limit & Eligibility.
3. Click on the Save button.
Refer to the screenshot:.png)
![]() The No. of shares and Max. Price Limit fields in Add Asset have comma separation in 1000s automatically once the user clicks out of the field after entering a value.
The No. of shares and Max. Price Limit fields in Add Asset have comma separation in 1000s automatically once the user clicks out of the field after entering a value.
Users can edit the available assets in the Financial Asset Index.
Follow the below steps to edit assets.
1. Setup a Closing price date on the Financial assets default page.
2. Select the check box of the required asset.
3. Click on  button.
4. Edit the required fields in Basic Details, Price Info, and Limit & Eligibility.
5. Click on the Save button to update the asset.
Refer to the screenshot:
The No. of Shares and Maximum Price limit fields in Edit Asset have comma separation in 1000s automatically once the user clicks out of the field after entering a value.
The latest created asset is displayed first in the Financial Assets Index.
Export the Financial Assets data
Users can export Financial Assets data in two ways:
A. By Using the Export Data option
1. Click the ![]() button to export the FInancial Assets details.
button to export the FInancial Assets details.
2. Export Data pop-up appears.
Refer to the screenshot:
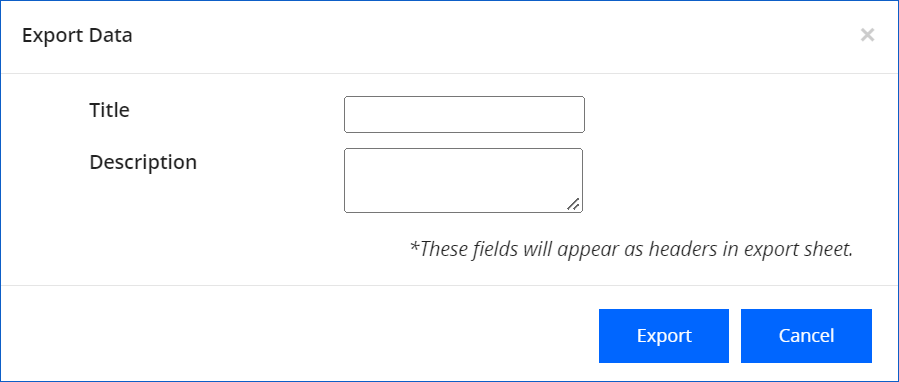
3. Add Title and Description.
4. Click on the Export button. Financial Assets data is successfully exported.
B. By using any of the grids
1. Right-click on any one of the grids.
2. Take the cursor to the arrow next to the Export option.
3. File format options will be displayed.
Refer to the screenshot:
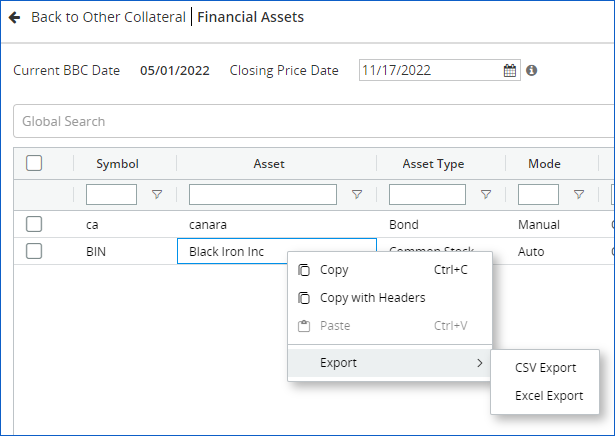
4. Click on the desirable format from the options CSV Export or Excel Export. The Financial Assets data will then be exported.